Tuesday, September 20, 2011

From Birth to Death

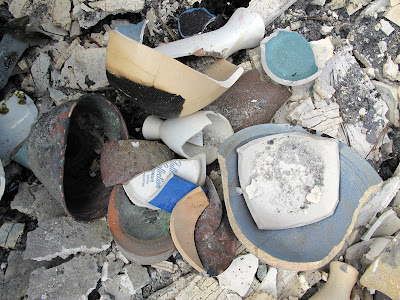
This will be the last post for this blog. Our house and studio burned in the Bastrop fire 2 weeks ago. We just got out yesterday to view the site and this is what we found. The stock tank pool for Jacob was mostly untouched. There were even a few inches of water in the bottom.


This is what remains of our house.


This is what remains of my lovely studio.


And our stove.


And I found a few still life objects. I dug through the ashes to get these out. I did find one white cup intact (porcelain, from Germany), which I kept. All the rest that looked whole, crumbled in my hands. I also found a small turp can, which you can see a picture of on my blog.


It was sad to see the damage, but also much needed closure. Now instead of picturing our lovely house in our minds the way it was, we see this. And that's ok. Because this is the reality. And now - ON to the next chapter!! Oregon or bust.

Sunday, August 8, 2010

Bathroom Office

This is my before office: the bathroom. Actually, it worked quite well. We had already taken out the bathtub, for other reasons, so we just installed a piece of wood for a workbench, and another for a shelf underneath. And did you notice the bubblewrap hanging from the shower curtain rod? The only problem was that my chair wasn't adjustable. : )


And below is my NEW office, in my new studio. I wanted slots for all my larger blank panels underneath, as well as my printers, paper, and boxes for shipping. Eventually I'll get something a little better for my bubble wrap - not sure what yet - maybe a shower curtain rod. I just ordered a whole slew of cork for my inspiration wall (found out the cheapest way to go for a big wall was 12x12in cork squares from Amazon pieced together), which will go above this workbench - I can't wait. Eventually my desk will have a formica top (on the solid core door top). Next ... more shelves.

Tuesday, March 23, 2010

small painting shelves

This is my new solution for storing small paintings. My husband built and installed it today and I've very happy with it.


Before now I've just made several little stacks against a wall on top of a cabinet. It was not ideal because I could only see about 6 paintings at once. With this I can see most of what I've got at any time. I can put new stuff in front, and there's not danger of it ever slipping off because of the little lip on the front of each shelf.

Tuesday, March 16, 2010

More shadow box stuff

A few people asked about light. I knew I wouldn't be able to rely on window light alone, so I installed a daylight balanced florescent light directly above (to avoid glare) my easel. Today was a drizzly day, so without the light I would have been working in the dark. In this photo (below) you can also see my shadow box with both lights that I mentioned yesterday.

Below is another closeup of my shadow box - in use. You can see the spotlight on the left (in a regular light fixture, attached to a long, bendy arm ordered from B&H). And the real white light attached to the pvc on the upper right.


Here is a close-up of my real white light, pointing up towards the white cloth and bouncing around a bit inside my box (no direct light). I've taped it so it stays in this UP position. And I use a "north light filter" from my buddy Qiang over the light to make it even more blue, because I like the effect on my setup.

A couple of you asked how I attach the wood to the tri-pid. (the shadow box sits on top of this wood - I don't have the box itself attached to the tripod) Hopefully the photo below explains itself. The black part came with the tripod, with holes in it, which worked perfectly to screw the wood on.


Lots of you have suggested my husband make a kit for this, but at this point he has no interest, sorry. I have suggested he make a pattern, and he may do that if I can talk him into it. I'll post about it if he does.

Monday, March 15, 2010

Close-up of shadow box

We bought a worklight (green - sturdy tri-pod) from Home Depot. We removed the worklight and mounted a peice of plywood on top. Then the shadow box, made of pvc and plywood, sits on top. Every great once in a while I remove the box and put my computer up there - when I want to paint from a photo. The dimensions of the box can be just about anything, but mine is around 2' cubed. It's a little wider than it is deep, but not by much. To attach the plywood to the box we used quick ties - as seen below.


Over the box I put a white sheet (allows the light to bounce around inside, lightening up the shadows a bit) and a dark cloth over that (so the other light in the room doesn't get inside). This allows me to almost completely control the light on my setup. Some does get in from the front, but so far it's been ok.

Saturday, March 13, 2010

Get Ready, Get Set ...

For a while I've been dreaming of custom shelves that would be just deep enough to display all my still life stuff, but not so deep I have trouble getting things out. My husband thought I was crazy, but I asked for 8" deep. We went to Home Depot to get the wood and he forgot that dimensioned lumber is actually less wide than it says, so my shelves are 7 1/4". But it worked out fine. Here is my husband installing them. Meanwhile I was frantically moving all my stuff from the old studio and putting them temporarily on the floor (left).

And here is the moment I've been waiting for! For some it might look like a bunch of junk - to me it is a lovingly managed collection of superb still life junk. There was just enough room. Apparently I am banned from ever going to Goodwill again.

Here is my painting corner, complete with my new Sorg easel, rolling palette and paint holder (awsome!), and shadow box.

And here is where I'll be taking naps ... I mean resting and pondering my paintings. You may notice the mat on the floor - it's a "Cadillac" mat from uline.com. I got a 10' one (3' wide) so my feet don't hurt - I back up constantly to look at what I've done.

And here is my beautiful little desk with a frosted glass top. I got it from Ikea and I really love it. And the cute little rug by the door (Target). I'm very happy.

Next we'll install another row of shelves for all my other stuff (books, etc.) and build a work table for shipping, etc.